
Printing your own zine is a fun way to publish your own writing without the hassle of endless rejection from other publishers. Like all DIY endeavors, it takes a little more work but the freedom more than makes up for it. This article contains everything you need to know to get started printing your own independent magazine today.
Here are the things you’ll need:
- A computer
- A word processor, like Microsoft Word (open source equivalent: Open Office)
- A Graphics Editor, like Photoshop (Open source equivalent: Paint.net)
- A laser printer (or access to one)

HP MFP M283CDW
Spud Underground is printed on this lovely machine. It is remarkably durable, customizable, and affordable via Amazon.com. Any technical printing specs will be in reference to this printer here.
Writing- The Fun Part
You’ll need a computer equipped with a word processor, like Microsoft Word. I’m an open-source elitist kind of guy, so I use Open Office to do most of my writing (it’s free!). Using the tips and tricks on page 5, create your content. Any content you want. Save it as a TEXT file in a location that you can access easily, because you’ll be revisiting it a lot. DON’T do any layout design to the text, this is only for copy-paste purposes.
Planning and Math
Spud Underground is printed on standard 8.5”x11” copy paper, folded in half. That means that each sheet of copy paper provides 4 5.5″x8.5″ pages, and that you can only add or subtract zine pages in groups of 4. So, how many pages do you need?
Start by getting a word count for each article you intend to publish. Total them all together. I can squeeze about 850 words onto a page, but nobody wants to read a wall of text, so I like to figure for 700 so I have room for error, pictures, and headers. I then do the math as follow, using the How to Start A Zine issue as an example:
4,200 total words ÷ 700 words per page = 6 pages (5.5″x8.5″)
6 pages + 2 (front and back cover) +1 (Rainier page) + 1 (content example page) = 10 pages
Round total up to nearest multiple of 4 (each sheet of 8.5″x11″ paper yields 4 pages) = 12 pages to lay out
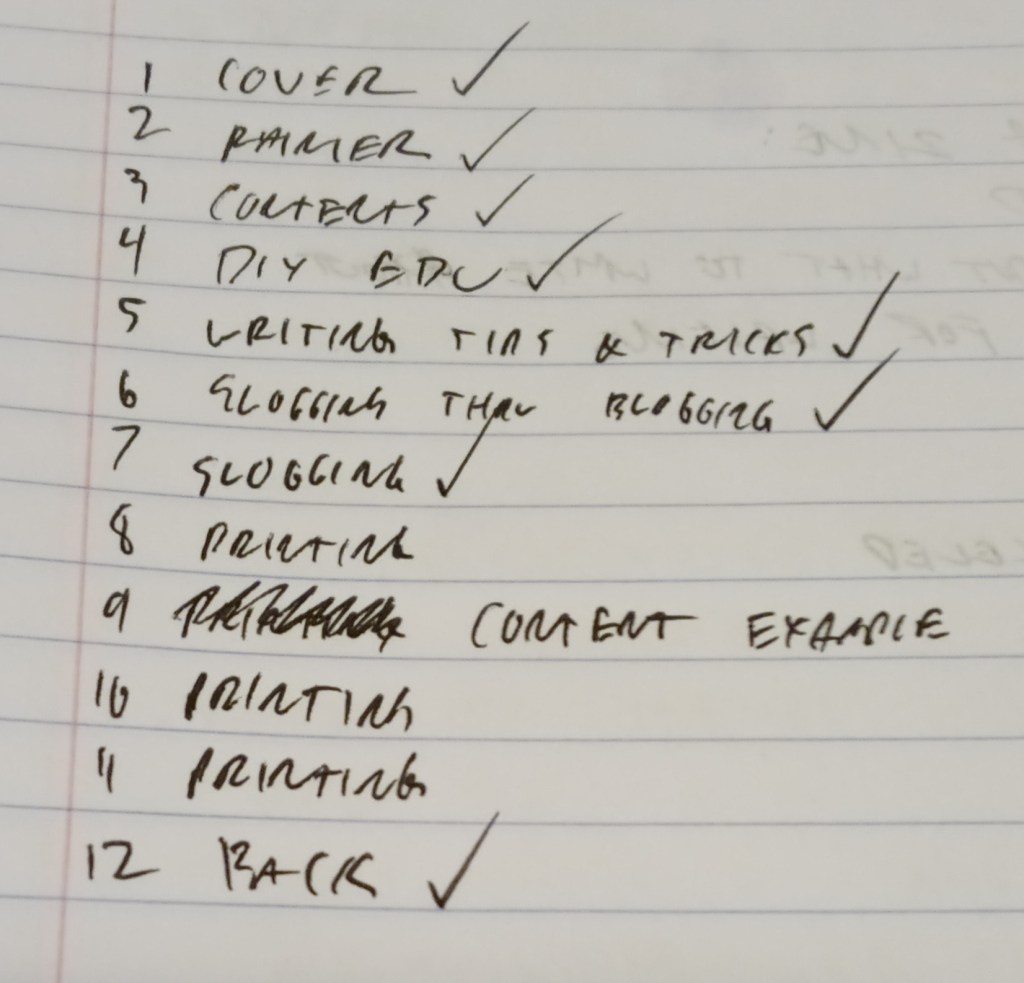
Suppose this all works out to a 12-page zine. Take a pen and make a list of 1-12 in a ruled notebook. Label page 1 as your cover, and page 12 as your back. Using 700 words per page, plot out what content will be on each page in between. Better to plan under, because it’s easier to fill white space with pictures than to cut content out.
Lay Out Sally
I suppose you COULD do the lazy thing and just orient your word processor into landscape, include pictures that way, and write around them. I tried that at first and found it to be clanky and unreliable, plus it was very limited as far as customization goes, so I do it the hard way. Load up your graphics editor (I use the open source and FREEEEEEE software called Paint.net) and set your canvas to 11” wide and 8.5” tall. Based on some math I did a long time ago, 214px is the optimal resolution for these projects- but I don’t really feel like getting into that today. Just take my word for it.

Optimal canvas setup for laying out a magazine in paint.net
Printers won’t print all the way to the edge of the page, so you have what’s called a “bleed zone” where your content gets cut off. The bleed zone varies by printer, but 1/4” is the standard. The template I’ve built puts a 1/4 inch margin from every edge, including where the fold line is, at 5.5” lengthwise.

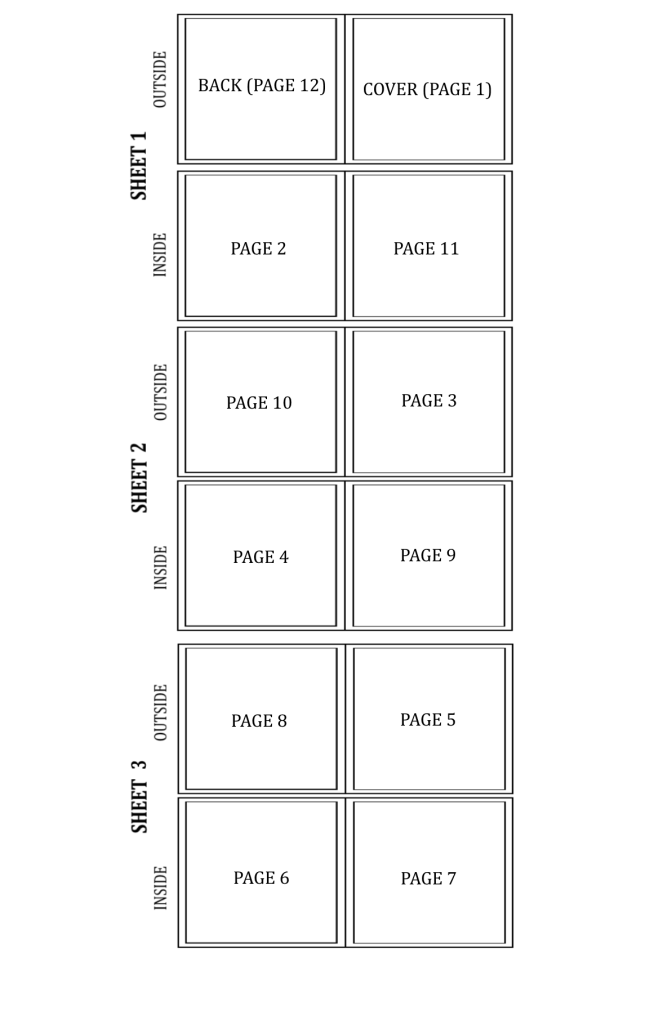
This is where shit gets strange, and it might help if you take the staples out of your Spud Underground copy and unfold it so you can see it more clearly. Because the sheets of paper that you print on are folded, the pages have to be offset. Assuming you have 12 pages in your zine, you’ll be printing on 3 sheets of paper (12/4=3). Each sheet has an OUTSIDE and an INSIDE that you’ll need to pay attention to in order to get your pages to line up.
The OUTSIDE of sheet 1 will be your covers. Make sure the front cover is on the right side, so that you can turn the page to the left. On the inside of this sheet will be pages 2 and 11, with page 2 on the LEFT so that it lines up with the cover. See the illustration below if your lizard brain can’t handle that.
Once you’ve got your templates lined up and your pages marked, you can start filling it in with content. Take your time and have fun with that! I’ll see you in step 4.

LAYOUT TIP: When laying out text, copy from your word files ONE PARAGRAPH AT A TIME. Paint.net’s text formatting is ass so you’ll have to do the formatting manually. That’s easier paragraph by paragraph than to do the article as a whole.
Spud Underground copy is formatted in 8pt Cambria font, arranged in two columns per page.
ALSO LAYOUT TIP: Design your headers and artsy stuff in a different file, then copy-paste it into the layouts when it’s done. That way you can reuse it or edit it much easier.
LAYOUT TIP THE THIRD: Use a new layer for EVERYTHING. Merge related content together when you’re done with the page to keep it clean.
Preparing to Print
When you’ve got all your content together, laid out beautifully on those templates, you can start exporting each layout as a .pdf file. You will need to download a plugin for this if you’re using Paint.net. Make sure that your template files and any measurement tools are either deleted or invisible, so that they don’t show up on the final print. Save each file as cover-spread.pdf, 2-11.pdf, 3-10.pdf, etcetera so you can keep track of them.
These need to be saved as PDFs so that you can merge them together in order to print duplex (front and back). You’ll need a PDF converter software- WPS office is a free Chinese office suit that has one of these built in. The free version only allows you to merge single-page PDFs, which is all we need for this, so you won’t have to pay for it. Don’t let the pop-ups tell you otherwise.
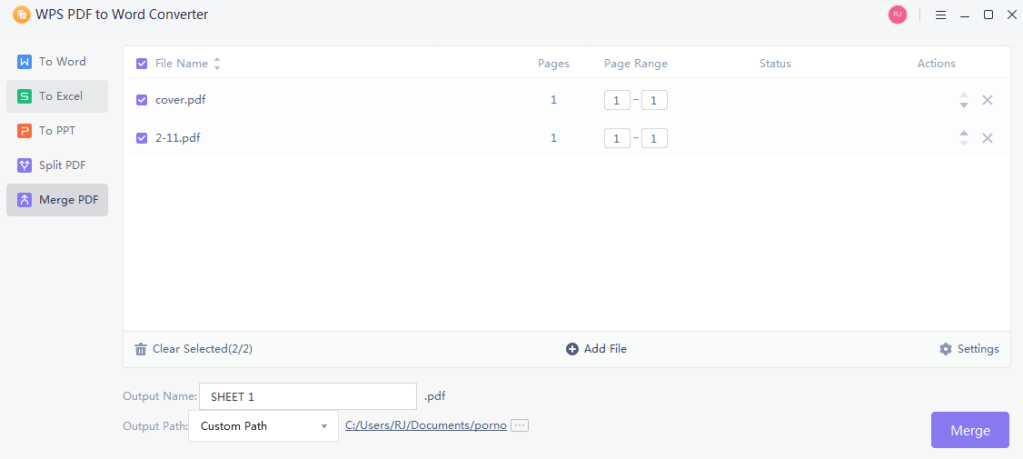
Merge cover-spread.pdf with 2-11.pdf and name it SHEET 1.pdf. Then merge 3-10.pdf with 4-9.pdf and name it SHEET 2.pdf. Then the last two pages and save it as SHEET 3.pdf, and keep going if you have more pages. In each case, you’ll get a two-page PDF file, ready for printing.
CTRL+P
If you don’t have your own laser printer, worry not, young grasshopper. You can put your PDFs on a thumbdrive and take it to Staples. They have a self-service printer that charges about 60 cents per page for color prints (20 cents for black and white, if you happen to be a cheapass with a boring zine). Getting your own laser printer is a much bigger expense upfront but saves loads of money down the road- especially if your zine takes off and you’re printing hundreds of copies like I am.

You can find refurbished printers for well below MSRP on Amazon or Newegg. That’s how I got my HP printer, which has been my trusty Spud companion since issue 4. Now, my printer’s documentation suggests that I use HP brand toner- but my wallet told my printer to go to hell.
If I were to use HP brand toner like I’m supposed to, I’d be spending over $800 per month on printing alone. You can buy compatible toner cartridges for 1/4 the price on Amazon. Even better, for some models you can buy toner refill bottles for 1/4 that price, and refill the compatible cartridges when they run out. Repeat until the cartridge starts streaking, leaking, or chopping. Using this process, I’ve gotten my color printing down to about 8 cents/page. By the way, this does not void your printer’s warranty.
ANOTHER FUN TIP: When laying out your text, keep all of the body text on one layer. Before you save as a PDF, reduce that layer to 80% opacity. This saves money on black toner and is still perfectly legible.
Final Judgement
I’ve found that, even after meticulous editing, running a computerized spell-check, and laying out each paragraph individually, sometimes you have to see the final product to catch those subtle mistakes. I like to print off a test copy, head down to the pub, and do a final round of editing over a beer. With a pen in hand, scan the whole damn thing top to bottom and circle anything that needs to be fixed. You’ll have to go into the original layout files to make the changes, then re-save as .pdfs, then re-merge everything. So, better to catch all those mistakes BEFORE you send the zine off to the presses, so to speak.
If you’re like me and you’ve been writing your whole life, just to be rejected by every publication under the sun, it might be better to start your own. Now you have! DIY publishing has never been cheaper or easier, and I hope you enjoy it as much as I have.


Leave a comment